updated 14-dec-2008
These are my notes on running Linux on the HTC Blueangel phone, and this is a kind of step-by-step guide based on information gathered elsewhere.
The objective of this document is to provide basic information and to promote the adoption of any open distribution of Linux on this phone.
Please, constructive suggestions welcome.
You spent a lot of money and ilusion on this device ... and got an unstable brick unmaintained by the provider
You spent a lot of time navigating at sites like xda-developers.com solving problems with this device unsolved by the provider
You don't want to buy anymore a Windows Mobile device that gets unmaintained in one year because new devices and new OSes (Windows 5.0, 6.0, 6.1,7.3, arghhh) come to market
When you changed your desktop Windows to destop Linux you get happy
You think thay hacking new Windows Mobile to get it working on your "ancien" BA is not the way (but is a way, thanks to guys participating at xda-developers)
If not all of your responses are "yes" then DON'T USE LINUX.
This documentation is for users of BA with some experience on desktop Linux, but with no experience with embedded Linux. This is my case.
In order to avoid a traumatic start with Linux, my intention has been to prepare clear information to return easily to Windows when required. The idea is to try Linux, play a little, and return home (Windows) when bored.
At this moment, THE LINUX KERNEL FOR THIS DEVICE IS UNSTABLE. But with the effort of more people we could get an stable one. At least, as stable as Windows.
This section is based on the information available at http://www.handhelds.org/moin/moin.cgi/BlueAngelHowtoInstallLinux. I added information for “non explained” or unclear questions, and modified some steps.
I also propose to get back to Windows as fast as posible, when necesary, without the need of an extra SD cards or a computer to restore the phone.
You need:
A SD card. I utilized a Transcend 1Gb (manufacturer reference TS1GSD).
A personal computer with Linux. I used Ubuntu 8.04 (Hardy), but I supose it will work on any actual distribution of Linux.
You can use the xBackup utility in the Programs menu, but first make a soft reset of the device and unload any running application before running xBackup. Preserve a copy of your backup in your PC.
I think that xBackup utility don't save SMSs.
If you get the error “file sharing violation ...” making the backup, In a forum a read the following solution:
Defragment the target SD card.
Turn the phone off / Goto flight mode.
Move the \Windows\StartUp folder elsewhere.
Unload all today plug-ins.
Run xBackUp and shut it down.
Reboot.
Run xBackUp from the Start MRU.
I also utilized PimBackup (http://www.dotfred.net/) for an extra saving of my PIM.
ActiveSync is not an option for me, too many problems with it (and it is Windows).
The information in the SD card will be lost.
Insert the SD card in the reader of your PC with Linux.
Open a terminal and log as root.
$ sudo bash
Check which device is your SD card isuing the mount command.
# mount
If you get something like "/dev/sdb1 on /media/usbdisk type vfat ..." then /dev/sdb/dev/sXX
Umount the automounted SD card selecting “Eject” in the mounted device.
Create the partitions using fdisk. You can use any formatting program, for example gparted, if you disconect the automount option.
# fdisk /dev/sXX
First, list partitions and delete it.
- Command p for partition list
- Command d for deleting partitions
Create a primary vfat partition of the required size. In my case:
About 5 Mb for Linux kernel and start-up utilities.
About 128 Mb for the Windows Mobile backup.
And space for other Windows data and applications that you require (for example, I use Tomtom).
Well, this sum about 500 Mbytes for me.
- Command n, select “p” (primary), “1” for the number of partition”, press Enter (first cylinder), and enter “+500M” for the size
Now, change the type of this partition to vfat.
- Command t, (autoselected partition 1), use type “c” (FAT32)
Now create a primary ext3 partition for the Linux filesystem.
- Command n, select “p” (primary), “2” for the partition number, press Enter (next free cylinder), and pres Enter (for the rest of the free space).
Write the partition of the device and exit.
- Command w
After this step, your Linux desktop may automount the SD card. If this happens, you must umount the SD before continuing.
Make the filesystems
# mkfs.vfat /dev/sXX1
# mkfs.ext3 /dev/sXX2
When finished, extract SD card.
Now it's the moment to test if we can restore our "windows mobile" device.
- Insert the SD card in the reader. It should be automounted.
- Copy your Windows stuff and data to the SD.
- Copy your backup of Windows to the SD. I also copied the PimBackup saved information.
Saving the data to the SD card will take a couple of minutes.
- “Eject” the card from the Linux desktop and wait until the data is written.
- Test the SD card on your phone trying to restore the backup.
Some things aren't restored:
-Date and time.
-Lock buttons
-Device password
In the introductory section it is the link to the source of information for getting Linux distributions and for installation. But you will need some read and extra effort to join all the pieces, so I prefered to provide you a "digest". In other section I will explain how to join these pieces.
There are two main graphical user interfaces for your phone GPE (X11 compatible) and Qtopia (Trolltech Qt). GPE gives me the feel of a Gnome desktop, and Qtopia seems a "phone" GUI.
I think you should test both. But remember. At this moment they are REALLY UNSTABLE.
I tested diferents builds found everywhere and these worked near OK for me.
GPE build from http://www.algepop.net/users/alge/angstrom-ba/images/htcblueangel/ . Root password is "rootme"
Date: 2008/xxx
Qtopia build from http://www.linuxtogo.org/~htcpxa/htcblueangel/Qtopia/
Date: 2008/04/11
- Untar the downloaded file in your desktop Linux. Inside are a directory called “linux” and a tar file.
- Insert the SD card in the reader.
- Copy the “linux” directory to the root of the vfat SD partition.
- Untar the provided tar file to the ext3 SD partition. For example, in my system
# sudo bash

cd /media/usbdisk-1

tar xpvf path_where_the_tar_file_is/tar_file.tar
- “Eject” the card from the Linux desktop and wait until the data is written.
I'm not sure if I do that in a grace way.
Open the "root terminal" in GPE and run the command shutdown -h now or shutdown -P now. In Qtopia you can find an option to do the same.
Be patient and note that the device don't turn off completly, It simply wait for a hard reset (I think).
In GPE, you can “suspend” your linux from the main menu or pressing the ON/OFF button of the phone. Be patient it will take a time.
After suspension, you can resume the device pressing again the ON/OFF button. This will take a couple of seconds.
This seems an “unstable” part of the kernel, and it could fail. Also, the device can resume without a known reason (at least I don't know the reason).
In the Qtopia version available here, the supend option is not available through the ON/OFF button. You need to configure the "power management" of configuration menu. And the device will suspend automatically when the configured time elapses.
The device can then resumed using the ON/OFF button, but it will require some time (be patient, another time).
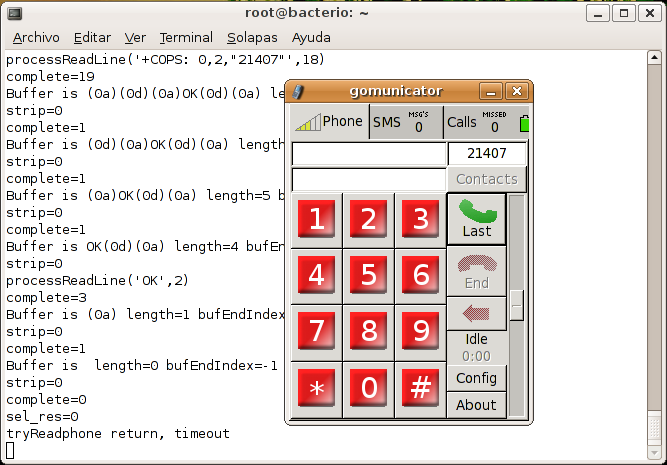
The GSM modem in this device is independent of the main CPU and it is controlled through the file device /dev/ttyS0. It is necesary a running application that uses this device.
If you use the GPE version available here, the best option for testing the phone is to log in as root (in order to have better rights to access this device) open the “phone” application (gomunicator) and start testing.
This application must be running to keep receiving calls. Also, if the device is suspended, a call will resume the device, but you will need to go to the "active tasks" folder to see the windows of this application.
Probably you can't ear the voice in the ear with this version.
If you use Qtopia, the phone will work smoothly. The "only" problem is that you will need to cry to the mic if the other side want to ear you.
Taking into consideration that this is Linux and the available GUI are in development, I think that the best way to use networking option is using line commads and file editing.
Both, GPE and Qtopia, have applications to do that partially, like our desktop Linux.
This worked for me using GPE. In QTOPIA it seems that the root password is other.
You can access your device from your desktop Linux computer trhough the USB conection of the cradle. You can do that using the USB gadget driver.
In your Linux phone:
- Test that the /etc/network/interfaces file includes the line:
auto usb0
In your desktop Linux:
-Connect the phone in the cradle and wait a moment because your destop Linux could connect automatically to this LAN device.
-Configure/reconfigure the conection using or, if you use this address. If your computer use this adderss then ??? (I will test later)
sudo ifconfig usb0 192.168.0.200 up
Now, your desktop computer is connected to your Linux phone. For example, you can log in using ssh. Note that the addres is not the same that the given above.
ssh 192.168.0.202
Taking into consideration that your Linux phone GUI server is based in X11 (for GPE), then you can do things like.
ssh -X 192.168.0.202
So you can run the applications of your phone and its window will appear in your destop Linux. For example, your can run gomunicator at this will appear.
Or, for example, you could navigate through the filesystem of your phone isuing fish://192.168.0.202 in Konqueror.